How to Paint Plastic Car Parts: A Step-by-Step Guide
Transforming plastic car parts with a fresh coat of paint can completely upgrade your vehicle’s appearance—but getting professional results takes more than just a spray can. Without the right preparation and techniques, paint can peel, crack, or look uneven. Learning how to paint plastic auto parts correctly ensures the paint bonds properly, resists peeling, and delivers a factory-quality finish.
Want a smooth, durable finish that truly lasts? In this guide on How to Paint Plastic Car Parts, you’ll discover proven step-by-step methods to properly prep, paint, and protect your parts for a flawless, long-lasting result that makes your car stand out.
TL;DR:
Painting plastic car parts requires proper preparation, the right materials, and careful technique to achieve a smooth, durable, and professional-looking finish. The process involves cleaning, sanding, applying adhesion promoter and primer, painting in thin layers, and sealing with a clear coat. Choosing the right paint for plastics, controlling application conditions, and practicing patience are key to success. For long-lasting results, maintain plastic parts with regular cleaning, UV protection, restoration products, and preventative care to preserve their appearance and durability over time.
Find quality used car parts in Brooklyn for your car repairs.
What Materials Do You Need to Paint Plastic Car Parts?
Painting plastic car parts requires the right materials and preparation to achieve a smooth, long-lasting finish. Whether you’re refreshing faded trim or customizing your car’s look, having the correct tools and products ensures that the paint adheres properly and withstands the elements. Rushing the process or skipping essential materials can lead to peeling or uneven results, so preparation is essential.
- Cleaning Materials: Soap and water, isopropyl alcohol or wax and grease remover
- Sanding Tools: Sandpaper (220-600 grit, sanding block or sponge
- Plastic Adhesion Promoter
- Primer: Automotive-grade primer compatible with plastic
- Paint: Base coat, color-matched automotive paint
- Clear Coat
- Painting Tools: Spray gun or spray cans, masking tape and paper
- Polishing and Buffing Supplies: Polishing compound, buffing tool
- Protective Gear: Gloves, safety glasses, respirator or mask
Preparing Your Plastic Car Parts for Painting
Properly preparing your plastic car parts for painting is essential to achieve a smooth, durable finish that stands up to wear and tear. Plastic surfaces require specific techniques due to their smooth texture and unique properties, ensuring the paint adheres effectively and remains resilient. Follow these steps for professional-grade preparation:
- Clean the Surface Thoroughly: Start by washing the plastic part with warm, soapy water to remove dirt, grease, and debris. Use a plastic-safe degreaser to eliminate any stubborn contaminants.
- Sand the Plastic: Lightly sand the plastic surface using fine-grit sandpaper (e.g., 400-600 grit). This step helps to scuff the surface, creating a texture that allows the primer and paint to bond effectively.
- Rinse and Dry: After sanding, rinse the part thoroughly to remove sanding dust. Dry it completely with a clean, lint-free cloth or allow it to air dry.
- Apply an Adhesion Promoter: Plastic surfaces often require a specific adhesion promoter or plastic primer to improve the bond between the surface and the paint.
- Prime the Surface: Using a primer designed for automotive plastics, apply one or two light coats. A primer helps to create an even surface and ensures that the paint adheres uniformly.
- Light Sanding (Optional): If the primer leaves an uneven surface, lightly sand it with ultra-fine sandpaper (800-1000 grit) and clean off the dust.
- Paint Application: Once the surface is prepared, apply the paint in multiple thin coats, allowing each coat to dry as per the paint’s specifications.
- Seal with Clear Coat: To protect the paint and give it a polished finish, apply a clear coat. This step is crucial for durability and resistance to environmental factors.
- Curing and Final Inspection: Let the painted part cure for the recommended time. Inspect the final result for consistency, and touch up any imperfections if needed.
Choosing the Right Paint for Plastic Surfaces
Selecting the right paint for plastic surfaces is crucial to achieving a durable and professional-looking finish. The smooth, non-porous nature of plastic makes it resistant to adhesion, so using the appropriate paint and following proper preparation techniques are essential for success.
Using the correct paint for plastic car parts is essential because standard paints may not adhere properly to flexible automotive plastics.
Types of Paint for Plastic
Not all paints are suitable for plastic surfaces—automotive paint for plastic is specially formulated to flex, adhere, and withstand temperature changes without cracking.
- Spray Paints for Plastic
- Acrylic Paint
- Paints with Built-in Primers
Preparing the Surface
Proper preparation is critical when applying automotive paint on plastic, as untreated surfaces can cause adhesion failure or uneven finishes.
- Clean Thoroughly
- Sand the Surface
- Apply Primer
Application Tips
- Work in Thin Layers
- Drying Time
- Seal the Finish
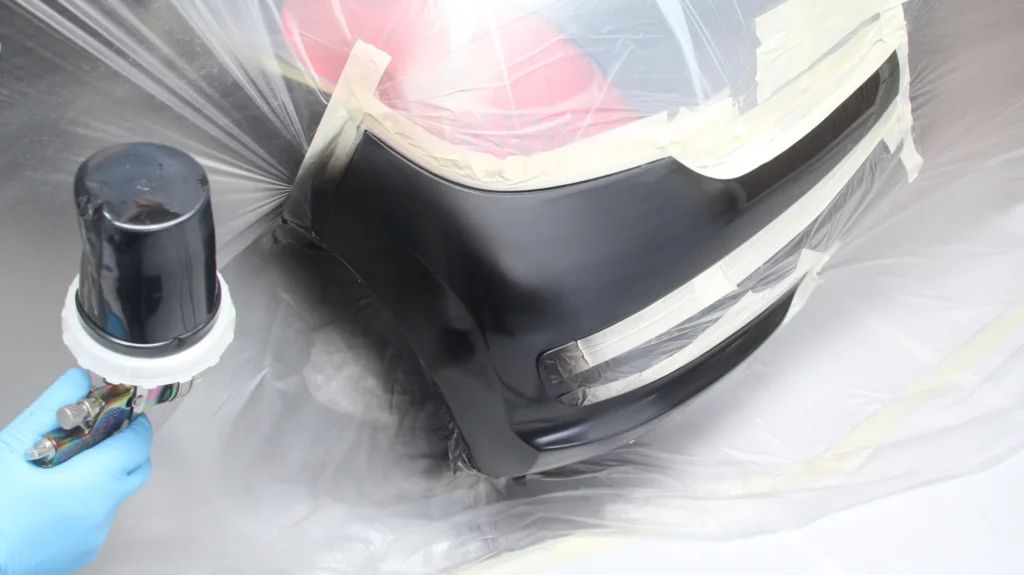
How to Paint a Plastic Bumper
Learning how to paint a plastic bumper follows the same core principles as other plastic parts, but bumpers require extra attention due to flexibility and exposure to road debris. Proper sanding, adhesion promoter, and flexible automotive paint are essential to prevent cracking and peeling over time.
If you’re wondering how to repaint a plastic bumper, the key difference lies in removing old paint properly and repairing scratches or cracks before applying new coats.
Techniques for Smooth and Even Application
Achieving a smooth and even application requires attention to detail, proper preparation, and the right tools. Whether working with paint, makeup, or adhesives, consistency is essential to a flawless finish. Below are some essential techniques to help you achieve professional results.
Principal Techniques
- Surface Preparation
- Choosing the Right Tools
- Proper Technique
- Control of Application
- Environmental Factors
- Practice and Patience
By following these techniques, you can achieve a professional-looking finish with minimal effort. The principles of surface preparation, tool selection, proper technique, and patience apply across many fields, ensuring versatile and reliable results.
Tips for Long-Lasting Results on Plastic Car Parts
Plastic car parts, such as bumpers, trim, and dashboards, require consistent care to ensure durability and maintain their appearance. Regular cleaning is essential to remove dirt, grime, and contaminants that can degrade the plastic over time. Use mild soap and water, avoiding harsh detergents or abrasive tools that could scratch or dull the surface. For protection against UV exposure, which can cause fading and cracking, apply a UV-protective spray or coating designed specifically for automotive plastics. These products create a barrier that preserves the color and elasticity of the material.
To rejuvenate older or faded plastic parts, restoration products such as plastic restorers or trim gels are highly effective. These treatments can bring back the original luster of the surface while adding a protective layer to prevent further wear.
It’s also crucial to avoid abrasive chemicals, like bleach or strong solvents, as they can weaken the material or cause discoloration. Stick to products formulated for use on automotive plastics to maintain their integrity.
Preventative measures can make a significant difference in the lifespan of plastic car parts. Use car covers or sunshades when parking in the sun for extended periods to reduce UV exposure, and consider applying ceramic coatings to create a durable shield against environmental damage. Address any cracks, scratches, or other signs of wear promptly with plastic welding kits or adhesives to prevent further deterioration.
Seasonal maintenance is also essential—inspect parts regularly in extreme temperatures to ensure they remain intact, as cold weather can make plastic brittle and hot conditions may cause warping. With these practices, you can preserve the look and value of your vehicle for years to come.
Key Takeaways
Materials Needed: Cleaning supplies, sandpaper (220–600 grit), adhesion promoter, automotive primer, color-matched paint, clear coat, spray tools, polishing supplies, and protective gear.
Preparation Steps: Clean thoroughly, sand lightly to create texture, rinse and dry, apply adhesion promoter, prime with plastic-compatible primer, sand if needed, then apply thin paint layers followed by a protective clear coat.
Choosing Paint: Use paints designed for plastic (spray paints, acrylics, or built-in primers). Proper surface prep (cleaning, sanding, priming) is critical for adhesion.
Application Techniques: Ensure proper surface prep, use the right tools, apply thin and even layers, control environment (dust-free, proper temperature), and allow sufficient drying time. Patience and practice lead to smoother results.
Long-Lasting Results: Regular cleaning with mild products, UV protection sprays, plastic restorers, and trim gels help preserve finish. Avoid harsh chemicals.
Preventative Care: Use sunshades/car covers to prevent fading, apply ceramic coatings for protection, and promptly repair cracks or scratches. Seasonal inspections are recommended to protect against brittleness or warping.
Frequently Asked Questions
Can plastic car parts be painted?
Yes, plastic car parts can be painted successfully if they are prepared correctly. Proper cleaning, light sanding, and the use of an adhesion promoter and plastic-compatible primer are essential to ensure the paint bonds well and lasts over time.
Do I need to prime plastic before painting?
Yes, priming is highly recommended when painting plastic car parts. Plastic is smooth and non-porous, so a plastic-specific primer or adhesion promoter helps the paint stick properly, prevents peeling, and creates an even surface for the color coat.
What type of paint sticks to plastic?
Automotive paints designed specifically for plastic surfaces work best. These include spray paints for plastic, acrylic automotive paints, and paints with built-in plastic primers. Using the correct paint ensures better adhesion, flexibility, and durability.
How do you prepare plastic car parts for painting?
Preparation involves cleaning the surface with soap and water, removing grease with isopropyl alcohol, lightly sanding with fine-grit sandpaper (400–600 grit), applying an adhesion promoter, and priming with a plastic-compatible automotive primer before painting.
You May Also Like
- How to Repair Chipped Paint on Your Car Like a Pro
- How to Clean Car Suspension Parts? Best Methods
- Do Dealerships Do Collision Repair? What You Need to Know
Reviewed by Carlos Jimenez – Mechanic